Friday 26 January 2018

My Chanel-type jacket - part 3. It's finished.


My last post about this jacket was over 4 months ago as I was busy with family things and making the outfits for the murder mystery weekend (with of course the exception of David’s Franciscan monk’s outfit that he made entirely by himself), posted earlier. However, I hadn’t completely forgotten about the jacket.


This post has been part written on each of several days. Today I just wanted to get it posted (I'm still feeling rather unwell). The quality of the photos could be better (understatement!)


After my last post, I removed the sleeves, reduced the size of the seam allowance in order to give a bit more space for my biceps and re-attached to the armscye. Previously, my pattern matching was absolutely perfect but for some reason I couldn’t get it perfect this time - strange as the sleeve attachment previously was very wonky as I discovered when I was removing - the seam width changed a few times and in places I had double or even triple stitched as I was having issues inserting the sleeves originally. I had to consider how many times it was appropriate to redo and took advice from Rory and Dan (Gillian's classes were finished) - their advice was that the sleeves hung beautifully and the pattern matching was fine so to leave. I took their advice. I also had to take into account that while this jacket will work for me, the sleeves are too short and although the fringe will hopefully disguise that, I’m not really a fringe person!! So this could be a really fancy wearable toile! No, not a toile as I will consider it a finished jacket but it will highlight any future changes required.

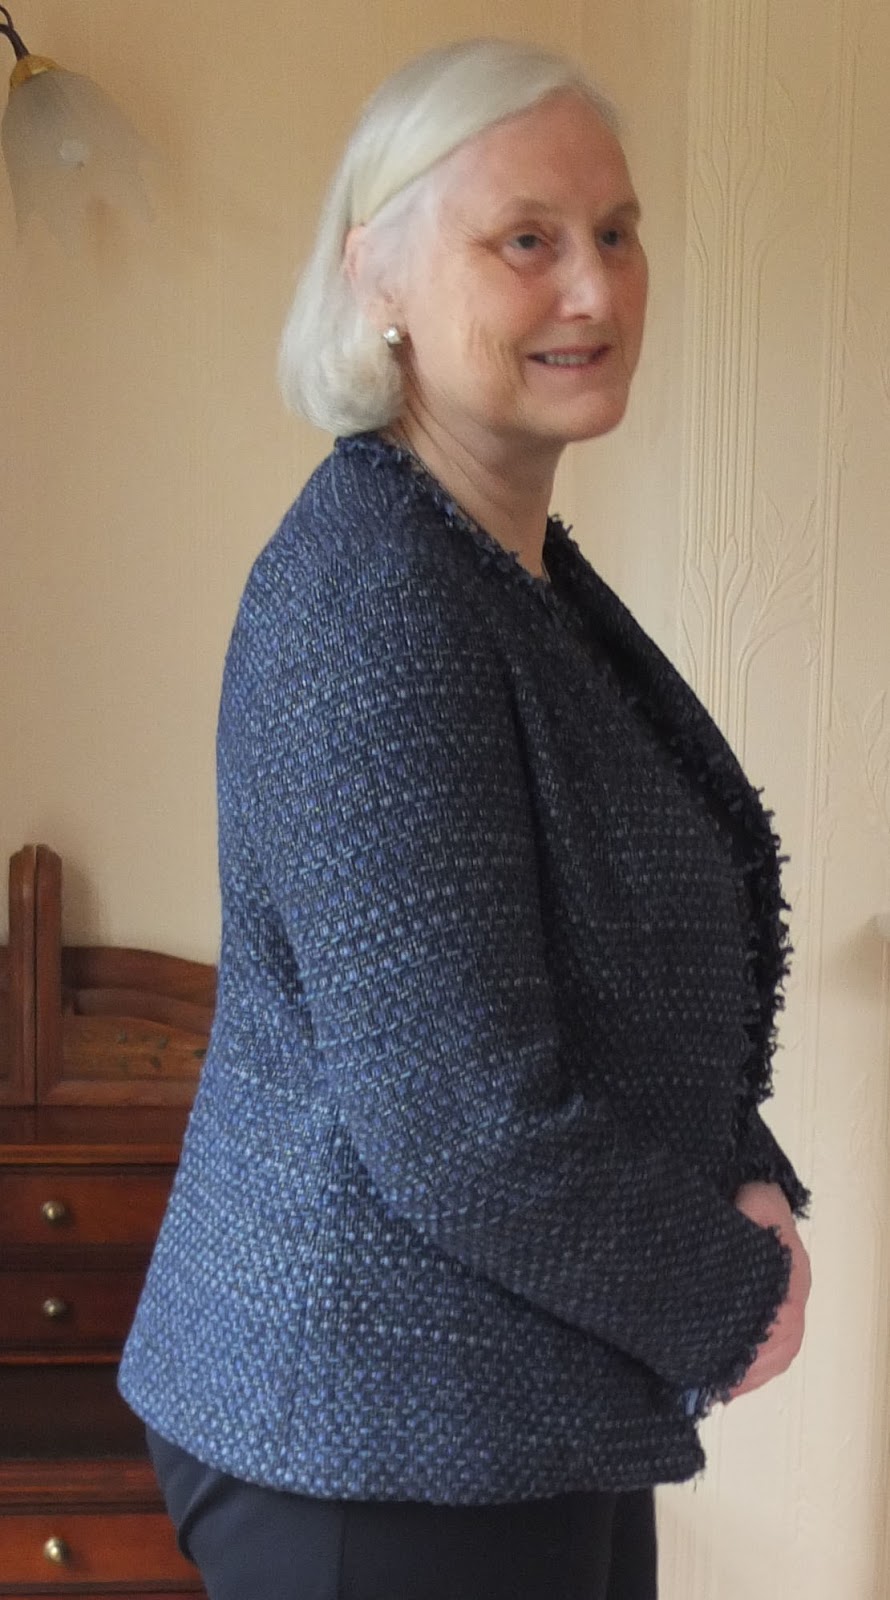
The next step was to create the fringe. As suggested by both Mary (Cloning Couture) in comment on my last blog post and Kate at my weekend sewing trip, I did try cutting the fabric strips on the bias and compared this to straight stitching. However, I preferred the appearance of the straight fabric strips. In addition, I had originally auditioned two fabric strips on top of the lining but found I preferred only one as it was less full - as I said above, I’m not really a fringe/frilly person and I found the two layers to be a bit ‘too much’. Anyway, I told myself, Chanel actually used the selvedge from the fabric (I considered that too) and one layer appeared closer to that. I used the lining fabric cut on the bias to allow it to go around corners more readily. Some people have asked me about this and how I did it. I'll have a look to see if I have any photos - I think I do but my computer is in intensive care and I've bought a new one which I haven't got set up as yet. I might have some on my phone. I'll post if I can - or perhaps post at a later date. I can't check at the moment.


I created the fringe strips in my sewing bee with Rory. Sorry Rory for the incredible mess this made (glad I wasn’t doing it at home!!). I couldn’t believe how many threads and the amount of lint from my fabric strips! I did have to trim the strips afterwards as they were a little too wide. Even more mess. I attached the strips to the bias cut lining and was ready to go.

I had already marked my jacket just inside the seam allowance with machine stitching, which would also act as stay stitching. Gillian had said to put tape around the neckline but as I was adding two layers of lining underneath into the neckline turnover, I decided, rightly or wrongly, that I didn’t need to do this.

I attached the lining part of the strips to the jacket fronts and neckline, just like you do with piping, carefully ensuring that the junction between the lining and the fabric lay along the stitching line. This was more difficult than it sounds as I could scarcely see my staystitching. Maybe I should have used a contrast colour of thread. I pinned and then tacked. I quite enjoy the process of tacking (basting) by hand and feel that it made it more likely for the horizontal patterns on the fringe and the jacket to match. I then machine stitched the fringe to the right side of the fabric. I did this at my last class of the year with Lyn, who helped me with the corners. I found it very difficult to sew with the bulk of the fabric on my right as was required for one of the corners. I didn't add fringing to the bottom hem. Despite my care, the pattern between jacket fronts and fringe doesn't exactly match but I’ve decided to leave it as I don’t want to carry the jacket unfinished over to 2018!


Ha! It's now 2018. Don't say you're surprised that I didn't get the jacket finished! In December, I started and completed the long-promised red silk dress for Helen, made a few Christmas presents and finished my knitted waistcoat. I did a little on the jacket but I'm unfortunately not someone who can watch TV while working and I usually watch with David in the latter part of the evening. If I'm really pushed, I'll sew right up to bedtime but I prefer not to do that.

Next step was to turn up the jacket hem and stitch it in place. I placed curtain chain weight in the hem fold and secured that at seam lines and the ends. This was the process if there is no fringing - I'm not completely sure how I would have done this with fringing. Just a minor modification to the process, I feel.


I said I didn't like the double fringing but the single seems a bit scrappy. I think maybe I'm just not a fringing person. I decided I'd continue, though. Next time I'd go for braiding - I would've done with this one if the sleeves had been long enough. I bought a choice of braid and of buttons but haven't used either.

Next, the lining seams. Sleeves first. The under layer of lining is smoothed across the seam and pinned in place down the seam line. It's then cut level with the fabric edge (forgot to say seam allowances were trimmed). Then the other side is smoothed across and folded under level with the seam line and the first pin taken out and transferred to keep the two lining areas in place. In some cases, I had stitched my quilting lines too close to the seam lines - I needed more side than I had anticipated. So I had to unpick a fair bit of my quilting and re-tie my threads. This is an ongoing task. Next time, I would be aware of just how far away from the edges I need to stay and this would save quite a bit of time.


It isn't too difficult - but, boy, is it tedious! I do hope it will be strong enough! I'd hate my lining to start falling apart.


I continued in this vein, a little bit each day. Things did move on and the hand sewing was often a relief from the day. Today (Thursday 25 January), I had just the sleeve lining/jacket lining armscye junction to do. I took it to class with Lyn - I haven't been well, not yet recovered and wanted a simple almost mindless task. Lyn advised folding the jacket seam allowances towards the sleeve rather than opening them out as elsewhere. She felt this would give a nice shape. I did this, then smoothed the under layer of lining over, pinned then tacked them in place, identifying the stitching line. Here Lyn offered an important piece of advice - the need to ensure the lining is not pulled too tight. I had been pulling too tight so adjusted that. After I pinned the over lining over, I tacked and removed the pins so I could try the jacket on. I think it looks pretty good. When I tried on, the tacking stitch was under pressure in one area so I added a little extra there.

I finished stitching one sleeve in place and managed to get the other stitched in place tonight.

I'm not putting pockets - or mock pockets, as you no doubt guessed.

So that's it finished!
I'm quite excited now that I see it finished!

It's rather crushed so I'll hang on Madame and steam tomorrow. David liked it when I tried it on and said he'll take some photos tomorrow.

I didn't steam before I took the photos as I was worried about losing what little light there was available. I also realised just now as I was finishing this post, that I didn't put the chain on around the lining/hem junction - after all that searching for suitable chain!! I'll probably leave it off.

Summary of resources used:
Chanel jacket class by Gillian Hargreaves - 2 days. I attended with Margaret (The Crafty Creek), who has blogged about the course. I'm not sure if she has finished the jacket as there has been no further blog post.
The Iconic Tweed Jacket by Lorna Knight (Craftsy class) I bought this a while ago and hadn't watched. I found it a great class and enjoyed the instructor but her methods were slightly different from those I was following from Gillian.
Books by Claire Schaefer
Assistance in class from Rory (Centre Front Studios) and from Lyn (WEA) as mentioned in body of text.

Then on to other projects!


Saturday 20 January 2018

PR Winter Street Dress - version 3 for me. My first wadder of 2018

Background

A while back, nearer the start of my sewing adventure, I made some Winter Street Dresses (pattern from Pattern Review.com) - for me and for my daughter. I made all of the dresses in a short time scale as Pattern Review was running a competition to make this dress to celebrate the launch of their in-house pattern range. Looking back at my PR reviews, this was in May 2014. Here is the link to the review of the blue dress - and from that, links to the others.


Description of pattern:
"Just like it's cousin - Summer Street Dress, Winter Street Dress is an easy to sew knit dress with a waist seam and a narrow pleated skirt. The narrow skirt with inverted box pleats has just the right amount of ease where you need it, resulting in a very comfortable and cute tulip shape. The bodice is drafted for a "C" cup. There is a choice of elbow length flounce sleeves or a full length sleeve. You can even make it without sleeves. The skirt is designed to fall above the knee for a more trendy look but it is super easy to lengthen or shorten it. 

From Winter to Spring to Summer, this is a perfect transition dress! 

Fabric suggestions - A variety of knit fabrics will work here but we recommend medium weight knits for a more structured look. The pattern will work for lighter weight knits like rayon jersey as well. We do recommend lining the skirt if you are using lightweight knits." (From PR website)


I made a dress from very stretchy fabric - review here and photo below this - it stretched lengthwise a lot and the dress got longer and longer and the waist lower and lower! I tried to fix it by taking up a large chunk at the waist from both bodice and skirt but I accidentally created a hole in the fabric when I was unpicking. The fabric was so difficult to use. That was the least of its problems. It got jettisoned. 

Without belt

With belt


Because of the stretchiness of the fabric, it appeared to fit better around my bust than my remaining blue version, which is the only one of mine which remains (Joanne still has hers, I think - that's in a wine colour which is rather nice - review here). 


My burgundy one was my first and never fitted well so was given away. (I still have some of the fabric so might make a top to go under the kimono; I think it's in the correct colour palette)

I only wore the remaining one a couple of times, really, as I didn't feel quite right in it partly because it felt a bit tight. Also, I felt the folds at the back of the skirt just didn't lie nicely, which I put down to it being a bit tight. I liked the fabric and the colour (blue) though so it was kept in case I got slim enough to wear it. 


Even in this one, at the making stage, you can see that the inverted pleats don't lie nicely.
I didn't realise it was this bad even then!

I had some fabric from the same range in my stash. This wasn't in a colour or shade I liked so much but it's a colour that has been suggested that I should wear (petrol blue, I think, though I saw it as green and I see it as a bit dull and sludgy - you can tell I don't like it!).  I decided I'd make another Winter Street Dress, since I originally made a lot of changes to the pattern and I still had the printed pattern (it was a PDF pattern), though now I'd have to go up a size.

Wednesday - 10 January, First sewing bee of the year

I took the blue dress to sewing class and tried it on. Rory agreed that I needed a bigger size for my hips. However, she felt the dress was going up a lot at the back - by that I mean the back of the skirt was substantially shorter -  and directed me to add quite substantially to the back waist at the centre (8.5 cms!), tapering out towards the sides. I also had to add to the sides back and front, but not to the centre front. The pattern is designed to be cut with back and front identical and on the fold. After the alterations to the pattern, I now had separate back and front pieces. I made the tucks as suggested. Only then did I realise that of course I had cut out the bodice, which at the time I thought fitted me, to the original size - it would have been better to go up a size, I now feel. This meant that I had about 2 cms extra fabric at each side of the skirt.

Showing extension to back height


Close up view of front at the front and back under that.


At Home

I didn't follow the directions given on the pattern as I was now going to have to modify the skirt portion. The directions put the sleeves in flat and the finishing touch is to sew up each side and sleeves. However, I made up the bodice, using stabiliser in the shoulder area - this was the first time I have manged to insert tape properly using my overlocker. I set the sleeves - no problems. I finished all raw edges by overlocking. Actually, for the first time ever, I used the 4 stitch overlock stitch and made up the bodice on the overlocker, though I machine tacked first. I think this has worked well and the inside looks neater, more finished than my last version, which has some unfinished seam edges. I added the neckband also in the round - doubling neckband, in the round, quartering, attaching to right side of fabric, testing fit, then folding to the back and planned to do decorative zigzag stitching or cover stitching to hold the seam allowances down. I didn't follow this method previously. I think I followed the PR instructions, which were good and Deepika had an online tutorial covering neckband insertion.

My previous neckline seam attachment is concealed and I finished the neckline by stitching in the ditch.  Last time around, the neckband was attached unfolded, to the right side of the fabric, folded over to the wrong side, the seam edge turned under and secured by stitching in the ditch from the right side. They look completely different, much to my surprise. However, this method looks fine. I don't have a cover stitch machine so planned to use a zigzag stitch to hold down the seam allowances inside the neckline but Rory didn't feel I needed anything other than tacking the overlocking to the seam allowance at the shoulder - we'll see if that works. I didn't  have enough of a suitable shade of thread to do the neckline, the sleeve hems or the skirt hem, in any case.

After my bodice was finished, I machine basted the skirt front and back together at the sides. As the skirt waistband is wider than the bodice waistband, I used an extra tuck in the skirt and basted the skirt to the bodice, ready to see what see what Rory would suggest.

Wednesday - 17 January. Second sewing bee.

I tried on the dress for Rory to look at the waistline area. There were a few changes made - by pinning in place after releasing the stitching - taking a bit off the centre back skirt and a small bit off the centre front bodice. Rory suggested I should have taken a wider tuck rather than the extra small pleat but I did what I did because I had already done it if you see what I mean! I knew the stitching would be coming out.

I tacked together to test out the new settings - I thread traced where the pins had been to give me an idea for matching the bodice and the skirt as of course, the seam allowances were no longer the same size.

Rory thought the waistline looked much better. She felt I needed even more width at the back but too late for that. Then she thought it was simply the fabric being caught up on my trousers, which I was still wearing. She said the side seams were running straight.

As I was measuring up the alterations for the two sides (Rory marked only one side, front and back), I realised that my skirt was decidedly lopsided! This must be the result of my poor cutting out as it had not yet been physically altered. I showed my finding to Rory who said we would need to even up the hem from the floor.

At home - Thursday 18 January

I stayed at home rather than going to my sewing with Lyn. There were two reasons for this. First, the roads were snowy and icy - and if you don't need to go out, why do it? Second, I do find it awkward to be doing the same garment in two different places with, potentially, three different tutors. So I didn't want to take this dress, and didn't have another project ready. Well, I do have my Chanel jacket but I'll finish that at home. I don't want to start yet another until these are out of the way - I have enough UFOs as it is.

I overlocked both side seams of the skirt. As Rory felt that the skirt could still do with a little room, I simply ran the knife down the edge, so making the seam allowance as small as possible. While pressing it, I found the unevenness of hem again - see photo - this is clearly bad cutting out, sadly.

This doesn't look too bad - but in reality it was much worse

this is the kind of difference in length I was faced with 


I then attached the skirt to the bodice by pinning along the marked seam lines. I put the folds back in but found it incredibly difficult to get them even - I guess this is because my cutting was a bit off. I did my best and tried the skirt on - and got David to mark the shortest point of the skirt. I wore small heels, as I would with this dress and he measured from the floor.


I was going to go on and finally overlock the waistline seam, in which clear elastic is used for stabilisation - but I really don't like how the pleats are lying. I'm heavier than I've been for a while (David also thought the top was a little tight; I agree) so I thought that perhaps when I'd lost a stone or so, the dress would lie better.

At that stage I planned to take the dress to class (Third Wednesday - 25th January) and see if Rory might suggest a better position for the pleats. I hadn't done any top stitching with twin needle as yet as I still didn't have the correct thread colour. I decided to put it aside.

Friday 19th January

I bought the thread. It's a reasonable match. Later in the day, I became quite unwell with a sudden acute UTI, so I didn't do any sewing.

Saturday 20 January

I'm feeling unwell but not the kind of that needs bed rest so decided to take it easy and just think about and look at some of my projects and write this blog post. No actual sewing or having photos taken. 

I reassessed the dress. No, it's not going to work. I don't have photos of the dress to show you and feel too unwell even to think of having some taken. Look at the blue one - this one is tighter and the back inverted pleats much worse. When I looked at the earlier photos, the dress didn't appear to rise at the back - same dress as Rory said to add 8.5 cms to - so this must be due to weight gain. You can guess where the bulk of my weight gain goes!

This is going to be my first wadder of 2018, I fear.

The waistline inverted pleats don't work for me. I am too hippy - as a pear shaped person, my hips are relatively bigger than my waist. I have quite a high hip. The dress fits at the waist, but the pleats on the skirt are pulled apart too quickly and as a result are distorted. They serve to emphasise my large hips rather than just provide the needed space for them. David put it well when he said they point like arrows towards the biggest part of my hips. This was said in a constructive way. And NO!  - I'm not showing a photo of the offending area!

I wondered how I could change this.
  • Perhaps just gathering instead of pleats? I'm not a fan of gathering.
  • Altering my shape ie losing weight, which I want to do, anyway. However, I am sewing clothes for how I am now so that's not an option for this dress and the blue dress had problems with the pleats even when I was lighter.
  • Not continuing with it. This style is not flattering and the colour is not my best. David found it unflattering - style, type of fabric and colour

I certainly wouldn't buy it. So I'm not prepared to put a lot of effort into making something I wouldn't buy and won't wear. You might think there isn't a great deal left to do in this dress so I should finish it but I can use that time for something ultimately more useful.

David has suggested the FLF system for assessing my sewing:
  • F - Fit. It must fit well
  • L - Like. I should like everything I try to make for myself.
  • F - Flattering - even when it's ‘only’ a functional garment.

I like that.

This dress fails all 3 of these criteria.
  • F - it doesn't fit. The bodice and sleeves feel tight. The least said about the skirt, the better!
  • L - I don't like it. This is a combination of fit, fabric, style and colour
  • F - it isn't flattering. This includes the style of the dress - even if it fitted, it wouldn't flatter as the style is just not for me

So - it's official - it's a wadder. I feel quite happy with that decision as I knew I'd never wear it. I wore its predecessor a few times but never felt comfortable in it - and I liked its colour much more. I realise now that it wasn't just being tight through weight gain that was the issue. I just don't like the style. I recall that at the time, I was less than positive about the pattern, at least for my first version - but I tempered my prose as it was a contest. This was my first review:

"This style is not for me. I needed to make too many alterations to the bodice to try to make it fit at my waistline and I therefore presumably lost the originally intended design, though even more changes are required. I have gone ahead and made further alterations to the pattern, with a view to trying again - in the process correcting my faulty drafting of the side seams on the bodice, and turning the wedge at the back into a straight increase to avoid the dress being too high in the centre, which meant that the skirt didn't lie properly. I have also made the sleeves bigger for next time as these were very tight on me at the biceps; I also plan to drop the armscye slightly. My problems were worsened as I washed the dress again after construction to see if that would relax it, as I thought some of my manipulations might have stretched it out of shape (I got it stuck in my sewing machine! More than once.) but I feel there was further shrinkage as the sleeves at the biceps became much tighter than they had been prior to that. 
I do plan to make it for my middle daughter, who fits more clearly into the target demographic group, I feel or perhaps the one I made can be modified to fit her! She is happy with raised waists, short skirts and pull on knit dresses. Mine would be too big, though, I reckon I would need to sew a medium for her but perhaps mine has shrunk to a medium and I would just need to shorten skirt and sleeves. Nice thought!
I can recommend it to others as it is easy to sew, looks easy to wear and looks good on the pattern testers." Overall - 'Pattern okay but did not work for me'

Thursday 18 January 2018

A Kimono for me! It's more or less identical to Joanne's.

Just after Christmas, I blogged about a kimono I made for my daughter - and in that post I was wearing her kimono (I still don't have a photo of her in it - she is very photo-shy). I could use the same photos again!! This time, I took some photos for Instagram on my phone and they are pretty awful. Black is so difficult to photograph. I tried to lighten the exposure to help. David took some on his camera and they are a bit - a lot - better so I can use here. 


I used the same fabric as I had enough left, though not enough to be quite as careful with my pattern placement. I don't think it's a big issue, though. I didn't make any further changes to the pattern. I thought I might have to shorten towards the original length and perhaps use the shorter sleeves. However, I managed to get the pieces in. So this is still version D, with the longer sleeves from the full length version C.


This was an easy sew - particularly as I had just made the kimono a month earlier. This was faster to make up, partly through experience and partly through realising I really didn't need to do all the hand tacking I did last time. I also benefited from the practice and I think the corners on my bias binding are nicer.


I was all too aware of the weight I have put on when I saw the rear view - unless I pulled it down, the fabric ridged across - a faux sway back! Actually, I do have a sway back, anyway, but didn't think I'd need to adjust a kimono. Maybe I should have gone up a size.


Overall, it's a good result. I like wearing it with my black trousers. Black isn't one of 'my colours', though (I prefer navy and suit it better - I'm a cool summer). I found that I didn't have a top to wear under the kimono, though I have compromised with tops and have already worn it a three times. When I modelled Joanne's, I used a black top but felt overwhelmed by it. The top in these photos is black but has warm colour stripes across the top and down one side - not easy to see in the photos because of the necessary overexposure. Do I make a suitable top? Do I simply put the kimono aside for when Joanne will inevitably need a replacement? I plan to make another kimono for myself - if I could only find that same fabric but with a navy base!! Otherwise, I have some suitable fabric though not as nice as that fabric with the flocked embellishment.


There's nothing more to say. Nice pattern - it's described as 'easy-to-sew' and it is!. All parts match where they should. I might try view B with a more drapey fabric. 


Sunday 7 January 2018

Plans for 2018

Plans for 2018

Comment - I had major problems with formatting the text - the end piece is awful but no matter what I do, I can't correct it - it just seems to get worse! At first it was lack of line wrapping but in this post, it's to do with bullet points. I trust you will overlook this!! I don't want to remove the post altogether.

RTW Fast
I have joined Goodbye Valentino’s 2018 RTW Fast. It’s easy for me not to buy RTW as it doesn’t fit - far harder for me to sew things I need. I’ve bought so very little over the last 3 years - the only thing, other than bras etc, that I can remember is my MOB outfit for Helen’s wedding in summer 2016 - I had planned to make my outfit for that but ran out of time - but still have lots of ideas and some beautiful fabrics. I tried to go sale shopping in advance of starting the fast on January 1st  - the only thing I actually bought was a cup of coffee! There were a couple of ‘nearlies’ - a cashmere pullover which was maybe a 7 and a dress which was maybe not the right size but I liked the fabric. I decided not to try either. Reference to ‘7’ - if each item of clothing you are contemplating buying is rated out of 10, you shouldn’t really buy if it’s less than an 8! That takes into account appearance, style, colour, fabric, fit etc. Obviously, if you’re desperate for something, you might have to become less discriminating and might drop to 6. This was not necessary for me so I declined purchasing.

7 Steps to Style
I am a member of 7 Steps to Style and evolve Your Style and will be trying to ensure that I stay true to my best colours and styles.

Patterns and garments
I will be working on creating blocks/slopers as already started and TNTs from commercial patterns. I will choose a small selection to work on.

Fabrics
I intend to use up (or at least break into) the special fabrics I have in my collection - dupion silk, other silks and lovely wools. These were bought for MOB possibilities. However, I am happy to buy good quality fabrics for projects as they come up. I’ve made more mistakes over unsuitable fabric than I can tally up. No more!!

MAGAM
The year will be largely devoted to sewing for me. If time is short, I will prioritise my sewing rather than that for others! I’m so selfish! (David says it’s time I was doing this as I sew for others and do very little for myself) I will try to put in a garment each month for the MAGAM challenge hosted by Sarah Liz - but I won’t sew something ‘for the sake of it’ eg for a contest or challenge.

Garments planned
I plan to make pieces which work together, based on a navy neutral and a grey (or just possibly burgundy) secondary neutral.

I have reread The Vivienne Files, Starting Out and 4 x 4 and plan to base what I do loosely on that.

As there are quite a few garments here, I decided to link into #2018makenine. As far as I can see, it’s simply to post plans for 9 garments over the course of the year. No penalty if you don’t achieve 9. Only thing is, they seem to be largely Indie patterns and I will mainly be sewing with the Big 4or my blocks if I can get them sorted.


I’m going to jump into my sewing this year with a repeat of the kimono I mad for Joanne. I modelled it as Joanne wasn’t available and really liked it. I have enough of the fabric left. It’s not quite in my colours - it’s black and wine, but I still have wearable black trousers. It’s an easy make. It probably needs a suitable top underneath - the black top I used for the photos was too drab.


This is Joanne's but I think I have enough fabric to make another

I modelled it


Trousers/pants - these will either be based on commercial patterns or my block. Perfecting a pair of trousers is my key aim for 2018
·        Navy trousers - at least two pairs. I wear trousers almost all the time. Maybe 1 in heavier and 1 in lighter fabric for our version of summer. I might use my block but I think it could be easier to get Vogue 9189, which comes in tall (as well as petite and regular) to work.


  • Burgundy or grey trousers. I have burgundy wool suitable for trousers but I’m not sure I have any grey.
  • I can’t afford to make too many pairs as I MUST lose weight.
  • I may try to make Style Arc Barb. I have the PDF with 3 sizes so that might work.


Jeans
·        I’d like to make a pair of jeans for myself. Not sure as yet which pattern I would use. Possibly McCall’s 5894 ‘The Perfect Jean’ and I’m sure I have another and of course, my block. I don’t have any Indie patterns for jeans. I have some denim I bought to use last year. Navy with stretch. Also, David wanted a pair of grey jeans and I bought the fabric - I might have to requisition that!
McCall's 5894 The Perfect Jean by Palmer/Pletsch


Jackets - commercial patterns
·        The Chanel-type jacket is navy based and will work with these. The jacket also has black, blue, pink and white in it, colours I’ll be able to pick out in accents. I’ll finish that by the end of the month and I should be able to post a completed version then - too many things going on in January to think I could be faster than that. It's my mother's 90th birthday this coming week and the whole family is getting together to celebrate. All this hand sewing is SLOW.
·        The Grainline Morris jacket - probably in cobalt/royal blue boiled wool. However, I’m still not convinced that the fit is quite right. So I might not do this at all. I would like a really casual  jacket.
Cardigans - x3
  • I’m not sure what patterns I will use here as yet. I have a couple of Style Arc patterns and I haven't tried this brand as yet. These will be worn with trousers and top, a style with which I am very comfortable. So one will be navy. One perhaps grey. And I’ve just purchased online a double faced navy/grey wool - this may be for a heavier jacket. I will wait to see how it feels when it arrives. I also have McCall's 6844 which I’ve used before. I made a peplum version that time but would forgo that this time.
McCall's 6844 - I'e made this previously and it's very popular

McCall's 6966 - similar but less popular.

Style Arc Abby. I've never used SA. This is a single sized paper pattern and I don't know if I have the correct size!

Blouse/tops/tunics
  • I intend to use natural fibres to make two, maybe three tops, if I have time. I have a number of RTW tops that still have life left in them so I don't need to go overboard. These will go with navy trousers and some with burgundy or grey. I have plain navy silk, though not much so maybe just enough for a tank; a lovely navy based silk; a baby blue crinkle silk (might be too pale for me though) and maybe a couple of other navy based prints that I bought when I was going to do PR’s wardrobe contest last year. It would have been great to do but I can’t sew that fast!
  • Navy silk tank - probably using the pattern I drew up last year.
  • One other item that I recognised was missing from my wardrobe was a plain jewel necked long sleeved tee shirt type top dressy enough for use under my blue checked jacket. I’m not sure what fabric this would be - preferably natural, preferably with some stretch (are the two compatible?) and in a fine smooth luxury fabric. Which pattern? I'm not sure - I don't think I will/I won't use the Cashmerette Concord though.
Special occasion
  • Dress and indoor type jacket (I haven’t decided on pattern to use as yet). I will use Royal blue dupion silk.
Shirt dress


  • I’m not quite sure which of my commercial patterns I’ll use. I have got a lovely fabric which has blues and greys and an almost peach-skin surface in mind for it. Also some classic chambray.
  • I'd also like  to make a casual every day dress in ponte de Roma - I could perhaps use the PR Winter Street Dress which I have made previously

I've made this 3 times previously, or is it 4? I've made the required modifications to the pattern (which were many!)


For others

Although I have said I plan to be more selfish this year, I also have some items to make for my family

  • Alison - I made a dress toile but hadn’t seen her in it and she told me she had gained a bit of weight. At Christmas, we were able to confirm I could go ahead with the dress. She had thought that as what I had sent her was a ‘toile’ she couldn’t wear it but I confirmed that she could, provided she liked it. The skirt part of the dress is a thicker fabric than the original but Alison confirmed that she liked that. I don't have the fabric for this dress as yet. A navy background rather than black is the plan. She has to wear black at work, but navy is her preference. When she tried it on for me, it was clear that the sleeves aren't right - I’ll ask advice about that when my classes restart next week.

  • Joanne - I will make her a pair of shorts. She wants black, as before.
Shorts identical to previous ones. I have the pattern. I’ve made it twice previously. It fits. It shouldn't take too long once I start. I’ve ordered the nicer of the two fabrics I used previously and the lace trim  - from Minerva fabrics.


  • Helen - a green silk dress. I’ve said she needs to buy the fabric for
    this herself. She has much better opportunities to buy as she lives in London.
    I got the last lot in Goldhawk Road and though that takes her over an hour to
    get there, that’s still far less than it takes me! I remember they had a nice
    green at the time I bought the red silk.

The long-awaited red silk dress. The green silk dress should be identical 

Also, the tartan skirt using our family tartan that has been on the cards for a couple of years now. Helen still hasn’t chosen the style - so that might be for her birthday or Christmas in 2018:

Style 2 - not our tartan

Style 1 - not our tartan

  • David - graphite jeans, another pair of brushed denim jeans and a checked shirt. I have all these fabrics. I also have fabric for a jacket but don't think that will see the light of day! David is in no hurry for any of these.


  • Grandsons - not sure really about whether to go ahead with shirts and gilets as contemplated.
  • Probably not!
  • Crucially, I plan to track my fabrics, patterns and makes rather more thoroughly in 2018 than I have done up until now!


    We had a number of trials in 2017, which I won’t go into, and hope that 2018 will be better from that point of view. We are hoping to downsize and move in this coming year so that will have an impact on sewing time available. I will take into account availability of classes/sewing tutoring available when we are deciding where to move to as I will really miss what I get just now.

How Do You Read Blogs?

It's a while since I've posted a blog,  lots of reasons. I'm thinking of starting again. However,  I used to read the blogs I fo...